Free tutorial for your Mind crafternoon – modern geometric felt Christmas cards

In this third blog post on hosting your own Mind crafternoon, I share a free tutorial for these snazzy Christmas cards. They combine two this year’s big trends: geometric graphic designs and brush lettering. Enjoy a peaceful afternoon at home or get together a group of friends for a Christmas crafternoon. Either way, slip into something more comfortable, put on the Wham, grab a mince pie and get making!
I’ve included full instructions below and a list of the materials you will need. You can buy the materials yourself or in a handy kit from my Etsy shop. The Maiden Aunt kit includes all you need to make 8 Christmas cards – you just need some sharp scissors, a ruler and a pencil or a biro (i.e. things that you and your guests probably already have at home).
If you are buying the materials individually yourself, you will need:
• Blank cards and envelopes
• Self-adhesive felt in colours of your choice
• Felt tip marker pens
Instructions
1. Choosing your designs
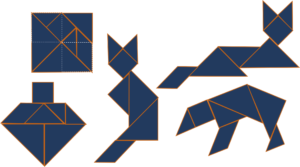
• Each design is made using a 5x5cm tangram square.
• Decide which designs you would like to make and which colours you would use. Write a list and then check that you have enough felt. For each strip of felt provided, you should be able to get 4 tangram squares.
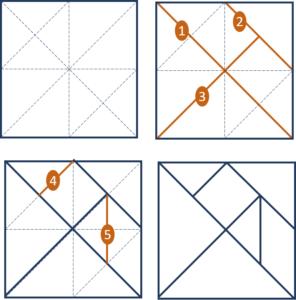
2. Measuring your tangram squares
• Using a ruler, measure out the number of tangram squares that you require on the back of the felt (i.e. on the paper backing).
• On each tangram square, use a ruler to mark the mid-points. Using dotted lines, divide each square as illustrated in the pictures above. This will guide you how to mark out the individual tangram pieces without having to do lots of maths.
3. Mark out the tangram shapes using the dotted lines as a guide. The pictures above show the easiest order in which to do it.
4. Once you have marked out your tangram, cut out the shapes. It’s easiest to work with one or two tangram squares at a time so that you don’t unintentionally mix up the pieces of different squares.
5. Arranging and sticking your designs
• For each card, arrange the tangram shapes in the design required. Allow space for text if you would like to include it.
• Remove the paper backing from the felt and stick the pieces into place. It’s easiest to start with one of the largest triangles and then adding the other pieces around them. If you leave a small gap between the pieces then you get more of a geometric look.
• Be careful not to stretch the felt once you have taken off the backing paper as this will distort your nice clean lines. It is better to hold the felt by the straight edges rather than by the corners and to avoid too much of your finger coming into contact with the adhesive.
6. Brush lettering and embellishment
• Add your greeting to the front of the card using the felt tip markers.
• The templates provided include a cheat’s brush lettering alphabet. The overall principle with brush lettering is to use more pressure on the downward vertical strokes. Writing normally and then going over the downward vertical strokes afterwards gives a brush lettering effect.
• Simple graphic designs work best – such as stars, string for the Christmas baubles or the checked floor for the cat.
7. Display, admire and share your photos of your Christmas cards
• Instagram: maiden_aunt
o #maidenaunt #makersgonnamake #imadethis #createmakeshare #christmascards #crafternoon #makemodern #christmasgarland #elf #feltcraft #tangram
• Facebook: maidenauntlondon
• Pinterest: maidenaunt0029
Templates